In this tutorial I am going to show you how to resize several images at once using a great Photoshop tool called Image Processor.
Image sizing is always an issue especially when trying to upload that nice image you just took with your camera to your website. Unless you have a low-res camera or you have a lightening speed Internet connection you’ll most likely find the upload process very slow. Even if you do have a crazy-fast Internet connection you might want to consider resizing your images anyway. Here are some reasons why.
- Large resolution images take up a vast amount of disk space. You might find yourself upgrading your hosting often if your website is heavily loaded with your images.
- Keep in mind that not all of your website visitors will have the lightening fast connection you do so the images will load very slowly for them causing them to leave your site in a hurry.
- Cut down the time you spend uploading your images. You can still display your images without comprising quality.
Let’s get into the how-to’s of proper bulk image resizing.
I’ll assume you have Photoshop and it’s open and ready to go at this point. [alert type=”e.g. general, error, success, notice”]This will only work in Photoshop versions CS2 and later.[/alert]
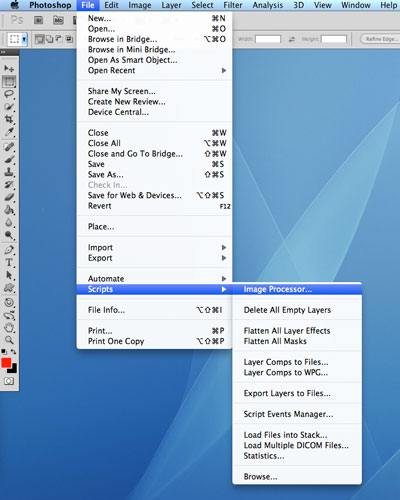
1. Go to File > Scripts > Image Processor and click.
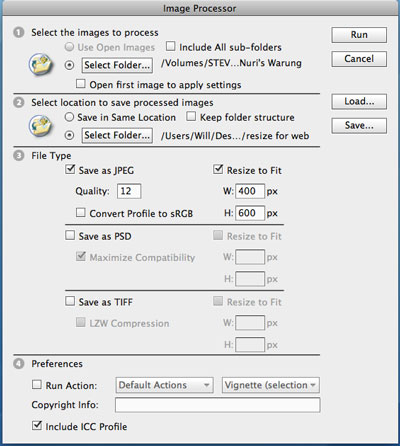
2. Next, a dialogue box will appear with several options. While you can get into all of the options later, I am only going to cover the ones you will be most concerned with when resizing you images.
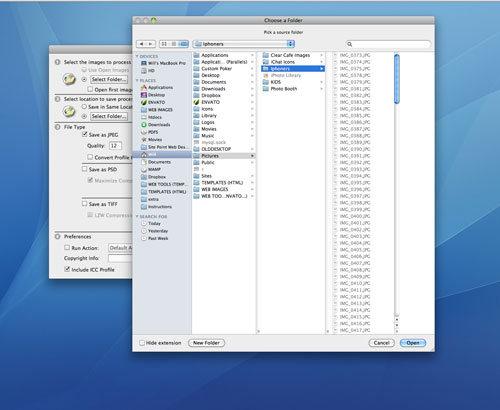
3. Click on the Select Folder button in the “Select the images to process” area at the top.
4. Find and choose your image folder.
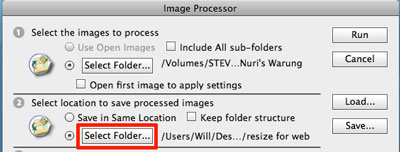
5. Click on the Select Folder in step 2. Select location to save processed images and choose the same folder but make sure that you create another folder inside to keep your images separate and organized.
6. Now for the File Type. Make sure Save as JPEG is checked and Resize to Fit is checked. Quality ranges between 1 and 12, choose 12 to maintain your image quality during the resize. Next, 400 px for width and 600 px for height is a great size to set images that will display nicely on your web page.
Make sure Save as PSD & Save as TIFF is unchecked. You can add your copyright info in the 4 Preferences area if you’d like.
7. Click Run on the top right. Your Photoshop app should start processing all of your images. You can go to your image folder location and see all of your resized images ready to go for uploading.
Please feel free to comment or ask any questions and I will respond as soon as possible. Also, if you have any requests for future tutorials please post and I will see if I can post it within a day or so depending on the complexity.


